Covering Up Greys with L’Oréal Root Cover Up! #rootsavedme

Hey, Readers!

Though my face may give people the impression of a woman younger than my 30-something years, my hair, well, it tells a different story. I have been greying since my mid-20’s, yet more of these silvery strands have been adding themselves to my head over the past few years. After taking my braids out of my hair, I noticed just how much whiter my hair has become. I was asked to try L’Oréal Root Cover Up in Black to see if it could easily spray away my greys.

Reese Speaks Root Cover-Up Feature Pic


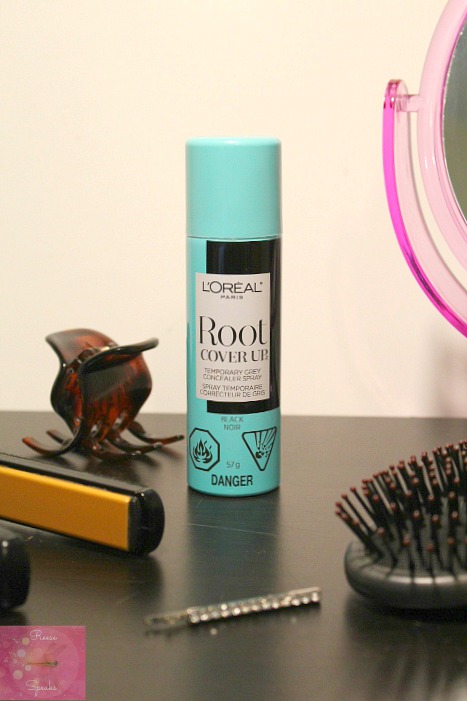
L’Oréal Root Cover Up promises to do the following: to temporarily conceal grey hair in 3 seconds, giving seamless coverage without any smudging or sticky residue when dry. It is ammonia and peroxide free and lasts until your next shampoo.


Reese Speaks Root Cover-Up Product Pic 2


I was really curious as to how well this product was going to work on my hair. I was worried that the colour was not going to match very well because my hair is an awkward shade of brown. It is not quite black, but it is not quite black, either. The Black shade of this product promises to blend in with shades from covers the range of really dark brown to jet black.

This is me before I used this spray.


Reese Speaks Root Cover-Up Before Use Pic


Yeah, I know! Especially in the front, right! It was crazy to see how white my hair has become.

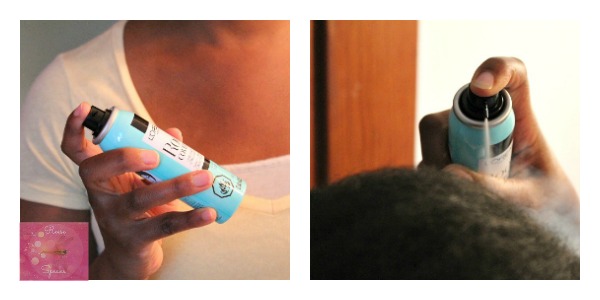
I was happy that the instructions are pretty simple:

  • Shake well
  • Spray about 10 centimetres (4-6 inches) away from hair


Reese Speaks Root Cover-Up Application Steps Pic


Well, here are the results, Readers!


Reese Speaks Root Cover-Up After Use Pic


I was really impressed with how quick and easily it covered most of my greys. The spray nozzle did not hiccup or stall, it covered a good area of my hair with a few blasts, and the colour blended well with my remaining dark hair. It continued to keep its coverage until I wash my hair.


Reese Speaks Root Cover-Up Head Before and After Use Collage Pic


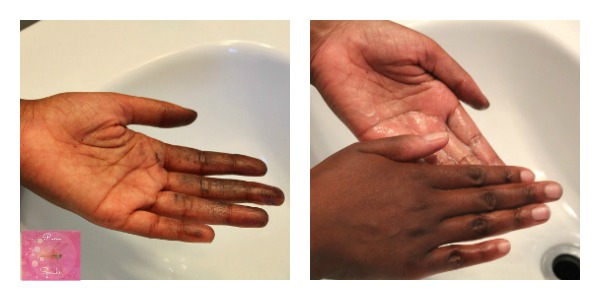
I did run into a few snags after using L’Oreal Root Cover Up. The first one was that some of the colour did come off onto my hands after waiting a few minutes to fix my hair a bit. It did not remove the colour on my hair (which I was happy about), but it did not dry as quickly as it said it would. A good wash cleaned it off well. This may have been due to the fact that I had a bit of product in my hair to moisturize it before applying the spray. There is nothing on the bottle that suggests that other products could result in making the product rub off onto hands after applying it to your hair. I could have also over sprayed my hair and it could be the extra product that came off onto my hands.


Reese Speaks Root Cover-Up Hand Rub-Off and Wash Pic


Another snag was that it did not get every single silver strand on my head. It was a little patch right smack on my hairline. After a few applications, the stubborn patch remained. Luckily, I was able to cover up this patch with my hair. Every other area I used this spray went dark.


Reese Speaks Root Cover-Up Uncovered Patch Pic


Overall, I was pleased with the results I received with L’Oréal Root Cover Up in Black. It took no time at all to hide most of my roots and white hairs with a few sprays and it was REALLY simple to use. The next time I use it, I will try to use less so the product will not smudge off on my hands. It was a good #beautyquickie!

What do you use to cover up your greys?

I received these products complimentary from Influenster for testing purposes.

Have No Tears with Amie Bright Eyes Makeup Remover – Product Review

Your eyes are probably one of the features that people take in when they see you. We like to dress them up and make them look expressive with makeup because of this fact. When it comes time for the makeup to come off, many of us dread removing eye makeup because it takes a fair bit of work to get it all off effectively, and sometimes it can irritate the eyes. This process makes me sometimes second guess wanting to put on eye makeup in the future.

I have tried a lot of eye makeup removers since I started wearing makeup, and I have used a few that work, but with some work. I entered and won for a giveaway a bottle of Amie Bright Eyes makeup remover from Victoria Styles, one of my favourite beauty bloggers who is the magic behind Living Disrobed. I was excited to see if this product would live up to what it promises. It says it will to get rid of all traces of makeup easily without irritating or stinging the area around your eyes. I could not wait for the opportunity to come up where I could put this product to the test.

ReeseSpeaks_Amie_Bright_Eyes_Product_Photo

Amie Skincare products were created to be gentle while getting the job done to care for sensitive skin. It is made from natural plant and botanical extracts, and doesn’t contain harsh chemicals.
I tested Amie Bright Eyes makeup remover after a great night at the Governor General’s Performing Art Awards Gala I attended on behalf of my friend Sandy from the blog Canadian Blog House. I had to get all gussied up for the occasion, and my eyes had to look their best. I wore mascara and a few different shades of eye shadow to complete my look for the evening. After I returned home, the last thing I wanted to do was stand in front of a mirror and remove makeup from around my eyes.

My sense of curiosity overrode my sleepiness, and I’m glad it did. All I had to do was add it to some tissue (a cotton ball would work better and not leave bits on your face, but I was out) and them apply it to my eye area. It only took a few swipes to get all of the eye shadow and the mascara off of my eye lids and lashes. It also had a light scent so it was refreshing yet not overpowering to my senses. The best part about using this product: No stinging! My eyes just felt clean and lighter without the makeup I was wearing before.

ReeseSpeaks_Amie_Bright_Eyes_Pour_Photo

I have used Amie Bright Eyes makeup remover a few times after this fun night out, and I had the same result. It is my one of new favourite beauty product to use, and I love dressing my eyes knowing that when it comes to removing my art work, it will be even easier than applying my eye makeup!

For more information about Amie Skincare, you can check out their website! You can also connect with them on their Twitter and Facebook pages.

Disclaimer: I received this product as part of a giveaway. I am in no way promoting Amie Skincare. I just wanted to share a great product and some amazing bloggers with you!

Adding a Pop of Fun to My Nails with Jamberry Nails!

Hey Readers!

Having three kids, two of them toddlers, mean that manis are one of the worst things I can have done to my nails. I am rough on my hands. They are constantly getting washed, scuffed, scratched and my nails get chipped, destroying any mani I had done. I love having my nails done, but I just can’t maintain the up-keep to them so they stay looking cute. When Jennifer Mansell gave me the opportunity to review Jamberry Nails, I jumped at the chance!

Jamberry logo

Picture used with permission from Jamberry Nails c/o Jennifer Mansell.

Jamberry Nails are a thin, non-toxic wrap adhesive that stick to your nails to quickly give your nails the look of having a mani or a pedi without the trip to the nail salon. Sisters Lyndsey, Christy and Keri came up with the idea after a trip to the salon and wanted to find less expensive alternative that can be done at home. Jamberry Nail launched in 2010, and with over 250 patterns to choose from, there are so many various looks and designs to try and enjoy.

Jennifer sent me a sample to try and encouraged me to take the Jamberry 7-Day Challenge. To prove that Jamberry Nails are sturdy while adding a bit of chic to your nails, Jamberry ask users to apply their nail wraps to their nails and take pics of your nails right after applying them, then again after seven days and compare the two to see just how well Jamberry Nails work.

Well, Readers, These are my “well kept” nails. Yeah, they need a bit of flare to make them more fun.

Jamberry_Hand_Before_Review_Photo

Here is what Jennifer was sweet enough to send me. She sent me the Jamberry Nail sample in their “Upper East Side” design, an orange stick and an alcohol wipe. I also had to get my hair dryer out to help apply the nail wrap to my nails.

Jamberry_Nail_Wrap_Application_Tools_Photo

The application instructions for Jamberry Nails were simple to follow. With a few coats of clear coat to jazz up the rest of my nails, here is how the Jamberry Nails nail wraps look on my nails.

Application Collage

These are some of the steps I did to apply the Jamberry Nails nail wrap.

Jamberry Nails also have videos on how to apply their nail wraps as we as a video for tips on trouble-shooting should you run into a issue while applying these wraps.

Application

Tips/Trouble-Shooting

I love them! I’m a bit posh, and the “Upper East Side” design is so perfect! It suits my chic and fun personality. It was really easy to apply. I also put the Jamberry Nails nail wraps through the wringer, not holding back on my daily routine of constant hand washing, painting (and cleaning off paint off of the “Bosses”), cooking, scrubbing and clacking away at my keyboard for seven days.

Jamberry_Hand_Applied_Day_1_Photo

Here are the results: They held up to a week of, well, maltreatment that my poor hands go through everyday! I had to look really hard to notice it. My clear coated nails are in worse shape than the Jamberry Nails nail wrap. They were really fun to wear.

Jamberry_Hand_After_Day_7_Photo

I would recommend Jamberry Nails to anyone who wants to quickly dress up their nails, fingers or toes, for a new look. They are easy to apply, and the numerous designs are fun and colourful, so you personality will shine through on your nails. I can’t wait to order a few sets to continue to add a pop to my nails in the comfort of my own home.

If you would like to connect with Jennifer Mansell or Jamberry Nails, you can do so online, as well as on Jennifer’s Facebook page!

Disclaimer: I was provided a sample of Jamberry Nails nail wraps to write this review. The opinions expressed are all my own because I love sharing product I enjoyed reviewing with you!

Until my next post, Readers!

Reese