Fun & Festive DIY Bunting

Hey, Readers!

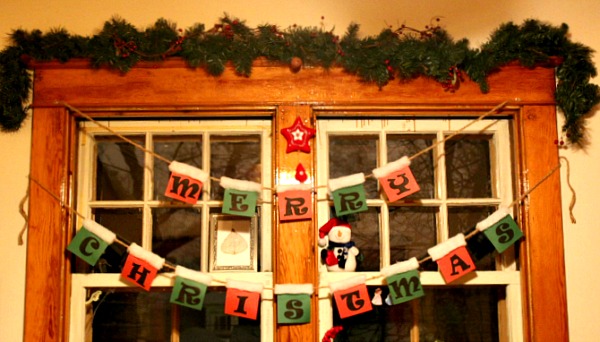
The big day is almost upon us. In my home, we are getting down to the last-minute items on our Christmas To-Do List, and we cannot wait to celebrate with family this year. Once the decorations were put up around our home, I felt that there was something missing from the space in front of the window in our dining room. After scratching my head for a few minutes, I came up with an idea to create a fun and festive bunting project to fill in this space.

reese-speaks-festive-bunting-complete-photo-4

These are the materials you will need in order to pull this project off:

  • Cardstock in festive holiday colours (8.5 cm x 11 cm)
  • Jute
  • Cotton blanket
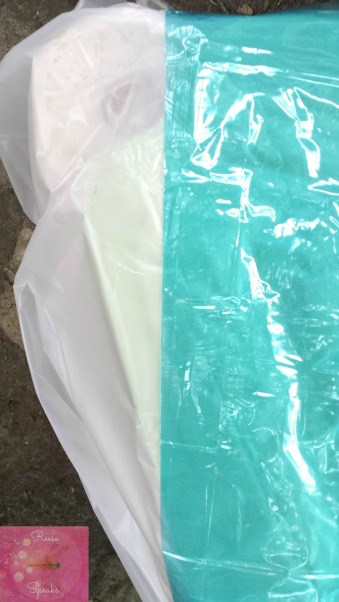
  • Blank/Computer paper
  • Tacky glue
  • Scissors
  • Tape measure
  • Ruler
  • Pencil
  • Eraser
  • Box cutter (optional)
  • Glue gun (optional)
  • Marker (optional)

Why use cardstock? Here are two reasons why I stock up on this type of paper for crafts:

  • Construction paper is not as firm as cardstock. It tears easier, and buckles when wet or nicked a bit.
  • The colours pop more with cardstock than with construction paper.

Below are the instructions to use to create your own festive holiday banner.

1. Write out the word or phrase you want to use for your banner. This way, you can figure out how the different colours of cardstock you will need and the letter size you want.

2. Measure the space you would like to hang your banner with the measuring tape to make sure it will fit in the space and to finalize the letter size you want.

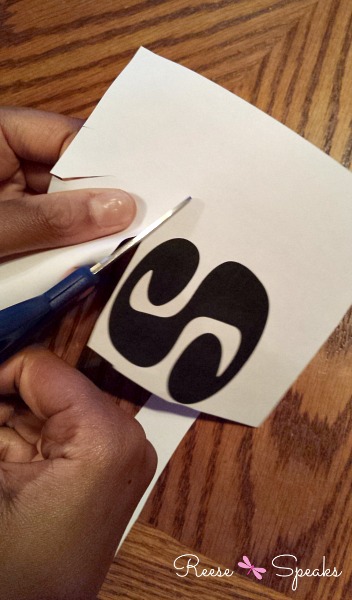
3. Figure out how big you would like your letters. I fiddled around with the fonts in the writing document application on my computer since I am not the greatest at creating them on my own freehand. I used the “Ravie” font at the 214 size for the letters I wanted. Print out the letters and cut them out. If you are running low on ink, use the same colour of marker to fill in the white spots. Note – If you have the talent to freehand the letters, write them out in the size you desire on the blank paper with pencil and them colour them in with a marker.

reese-speaks-festive-bunting-letters-photo

4.After finding out how big I wanted my letters to be, put a letter up against the cardstock to see how much of it I would need as the background for the letters and to fold over the jute. I found out I needed two sheets of red cardstock and two sheets of green cardstock since the letters took up a little less than one-quarter of cardstock.

5. Cut the letters out of the piece of paper they were printed/designed on.

reese-speaks-festive-bunting-letters-cut-photo

6. Cut the pieces of cardstock to the size you need. For a straighter line, I used a box cutter, a ruler and a hard surface I did not mind getting nicks and scratching on to get a cleaner line for the background colours.

reese-speaks-festive-bunting-cardstock-cutt-photo

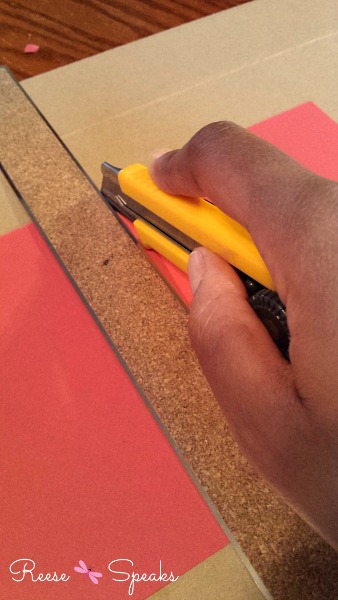
7. Score the amount of cardstock you would like to use for the flap to attach to the jute with the box cutter so it will fold over easier. Make sure you score the backside of the cardstock so it looks rounded and will bend easier. You also use a draw a line with a pencil and ruler on this paper and gently fold it over to do this step.

8. Line up the letters with the corresponding colours of cardstock they will be attached to in order to avoid gluing a letter onto the wrong piece of cardstock.

9. Minding the clearance given to the section that will fold over the jute, glue the letters in the center of the cardstock.

reese-speaks-festive-bunting-letters-glue-photo

10. Once the glue is dry, stretch out a line of jute and align the letters along its length. This will help you figure out the spacing out the letters correctly and if more than one line of jute is needed. I allowed for 3 inches of space between each letter. I also left a generous amount of space at the ends so it can hang down. I think it looks nicer than if it was pinned at the end of the jute.

11. Measure the cotton blanket to cover all of the back flap and two inches above each of the letters on the cardstock.

12. Cut out the cotton blanket pieces and use tacky glue to attach them to the cardstock for a snowy and festive look.

reese-speaks-festive-bunting-cotton-blanket-glue-photo

13. Find the center of the jute and place it in the middle of your work surface. I used a piece of twine to mark this spot just in case the jute shifted.

reese-speaks-festive-bunting-attach-first-letter-photo

14. Line up the word or phrase in the correct order.

15. Find the middle letter of the word or phrase on the cardstock to be attached to the jute and center it along the jute. Flip it upside-down.

16. Remove the twine on the jute and use your heated glue gun to attach the cardstock to the jute. Tacky glue can also be used if little ones are assisting in this craft. Press along the flap where the glue was used so it will stick together. Continue to add the cardstock to the jute working from the inside of the word or phrase to the first/last letter with the desired spacing. Allow to dry.

reese-speaks-festive-bunting-glue-jute-photo

17. Affix the banner to the surface you measured out at the beginning of this project, leaving some jute dangling off the ends. I used push pins and stuck them into the frame of the window to keep them from falling down. You can also use suction cup hooks or other non-hole forming aids to keep your work on the wall or banister.

reese-speaks-festive-bunting-complete-photo-1

There you have it! This is how I created this fun and festive banner to help bring some holiday spirit to our home. There are so many ways you can put your own spin to this project. For New Year’s Eve, I would use shiny cardstock or trace the letter attached to the cardstock with glitter glue. You can add holiday pictures or symbols onto cardstock along the cardstock, or mix them in with the letters. This banner idea can also be used for birthdays or other occasions.

If you are in a pinch to add some more holiday flair to your home, this Fun & Festive DIY Banner project is easy and fun to create. It is more fun when the family is involved. I hope you enjoy putting together this project as much as I do!

What is your favourite holiday or festive DIY project to put together?

Until my next post, Readers,

Reese.

Gone Fishing Party Theme Table Idea

Hey Readers!

I wanted to do something special for my other half for his birthday last year. He was turning the Big 4-0, yet has never been big on celebrating in a splashy manner. Since my guy does so much for our family, I could not let this important milestone go by without some kind of fun. So I thought for a few days on what my guy would like for me to do for his B-Day, and I came up with this small, yet fun theme party idea that he would find fun. Since he loves fishing, I thought I could put together a cute “Gone Fishing” party area for everyone to sit around and enjoy to celebrate his special day!

If I didn’t already love craft and dollar stores already, I certainly started after putting together this idea! Here are the supplies I used  to put this party theme idea together:

Bunting Supplies:

  • Card Stock
  • Yarn
  • Scissors
  • Marker
  • Measuring Tape (not pictured)
  • Tacky Glue (not pictured)
  • Box Cutter (not pictured)


Reese Speaks Gone Fishing Bunting Supplies Photo 2


Water Table Supplies:

  • White Plastic Table Cloth
  • See-Through Teal Shower Curtain
  • Rocks,
  • Faux Greenery
  • Blue and Green Food Colouring
  • Glass Bowl
  • Plastic Wildlife
  • Balloons
  • Floating Floral Candles
  • Packing Tape (not pictured)
  • Sandy-Coloured Sizzle Paper (not pictured)


Reese Speaks Gone Fishing Table Supplies Photo 2


I tackled putting together the bunting together first because it is the most time-consuming part of this theme to create. My first move was to find a spot I wanted to set up my surprise and measured the space so I would know how big I would need my letters to be.

To make triangles for my bunting, so I measured the size I wanted for each piece of card stock. Based on my measurements where it was going to hang, I found I could get two triangles out of each piece. I only needed eleven letters, but I made a few extra just in case I goofed up when writing on them.


Reese Speaks Gone Fishing Measure Bunting Photo 2


I cut out each triangle shape, scoring each one about two inches from the top so it would be easy to fold. I scored each piece about 2 inches from the top and folded it down. I then wrote out the letters on the pieces.


Reese Speaks Bunting Cutting Collage


Since I knew how big the area was for this theme table, measuring out the length of yarn I needed was the fun part of this task. I spaced the triangles along their lengths so there would be about 3 centimetres between each letter. When I put together this idea again, I will try using twine instead of yarn.

For my own piece of mind, I lined up all of the letters in the order that I would be attaching them to the piece of yarn so, in my tired state of mind, I would not flub up and mistakenly put a letter in the wrong spot.

I placed the first triangle on the yarn and applied tacky glue along the scored line of the triangle. I moved the yarn on the line of glue and folded down the flap, smooshing it down so the glue would adhere to both sides of the cardstock and the yarn. Once all of the pieces were attached to the yarn, I placed it, face (or letter)-side down to dry (for about 10 minutes). I also placed heavy objects on top of each letter to make sure the flaps stayed in place to stick together.


Reese Speaks Gone Fishing Gluing Bunting Photo 2


Now on to the more creative part of this theme table: the water table. I was trying to achieve the grassy banks we would see along the river we would see whenever we went fishing with my other half’s father. I decided to use the sand/water table our kids have in our backyard, and I put the cover over it so I could have as flat of a surface as possible. I then spread the see-through teal shower curtain over the white plastic table cloth over the table, affixing them to the table with packing tape.


Reese Speaks Gone Fishing Table Covering Photo 2


Placing the grass around the back and the side of the table was next. I fanned each piece out and tried to make it look as “natural” as possible. I kept these pieces in place with packing tape and folded the extra bits at the bottom under the table.


Reese Speaks Gone Fishing Table Grass Collage Photo


To make my “pond,” I placed my glass bowl in the center of the table and added water to it. I then added ten drops of blue food colouring into the bowl, followed by about five of the green colour. After swirling them together, I then played around with each colour until I got the right shade of teal that matched the shower curtain/table cloth covering.


Reese Speaks Gone Fishing Table Water Colouring Photo 2


The sizzle paper was a spur-of-the-moment idea I had when I felt that the grass looked a bit sparse. Thank goodness for my pack-rat ways! I then ran into my storage area where I keep all the sizzle paper I received from a previous review products and added it to fill in spaces between the grass to make it look more grass-like.

Next stop: decorating time! I place my animal wildlife, rocks and floral touches all over the table and inside of the bowl to add more fun.


Reese Speaks Table Decor Collage


It was time to bring out the bunting! Since our porch kind of looks as though it could be a dock, I hung the bunting above the table to bring the theme together. I then added more sizzle paper and balloons along the rails to add to the theme and to make it look more festive.


Reese Speaks Gone Fishing Bunting Complete Photo 2


What kind of fishing trip is complete without chairs to sit in?! I rustled up two of our camping chairs and added some balloons to add even more fun to this theme table.


Reese Speaks Gone Fishing Table Chair Balloons Photo 2


The second-to-last bit of business I had to deal with was the fishing gear. I added the finishing touches by placing the two fishing poles on each chair.

Now I was able to show the birthday boy the reason why I got out of bed on his birthday. He was surprised since this was my first attempt at putting together a theme table like this in a short amount of time. We all had fun on my guy’s 40th B-Day! It was great to sit back and pretend to be at the lake without leaving the comforts of home.


Reese Speaks Gone Fishing Feature Scene Photo 2


What I like about this Gone Fishing theme table is that it does not have to be just for a birthday party. This table can act as a water play table for quite a while, and the items used can also be used again for other ideas or playtime. You can also change what the table looks like, or expand the theme by adding fish themed snacks or cupcakes. The lid for the water table can be removed and you can have a different design all together. The sky’s the limit with this Gone Fishing theme table!

Cost to put this theme together – roughly $60.

Length of time to complete – about 3 hours (I adjusted the time a bit because I had to take photos as I put this idea together).

What sort of thing would you add to make this Gone Fishing theme table fun?

Until my next post, Readers!

Reese